-- Select --
Aderyn
Aegir
Aeron
Agnes
Agrafena
Agwe
Akkarog
Alasie
Alberich
Alberich (Costume)
Alexandrine
Alfrike
Alice
Almur
Ameonna
Ametrine
An-Windr
Anastasia
Anton
Anzogh
Aodhan
Aouda
Ares
Ariel
Ariel (Costume)
Arman
Asterius
Athena
Atomos
Azar
Azar (Costume)
Azlar
Azlar (Costume)
Bai Yeong
Balbar
Baldur
Balthazar
Balthazar (Costume)
Bane
Bane (Costume)
Bauchan
Belith
Belith (Costume)
Bera
Berden
Berden (Costume)
Bertila
Bertulf
Bjorn
Black Knight
Bobo
Boldtusk
Boldtusk (Costume)
Boomer
Boril
Boril (Costume)
Boss Wolf
Brienne
Brienne (Costume)
Brynhild
Buddy
By-Ulf
Caedmon
Caedmon (Costume)
Caitlin
Candy
Captain Kestrel
Captain Nemo
Captain of Diamonds
Carol
Carver
Carver (Costume)
Cathal
Chakkoszrot
Chao
Chao (Costume)
Cheshire Cat
Chick Jr
Chochin
Cillian
Clarissa
Cobalt
Colen
Colen (Costume)
Cristobal
Crystalis
Cyprian
Cyprian (Costume)
D'Andre
Danzaburo
Dark Lord
Dawa
Delilah
Devana
Director Zuri
Dolgoon
Domitia
Domitia (Costume)
Dr. Moreau
Drake Fong
Edd
Ei-Dunn
Eichelborg
Eiora & Fluffy
Elena
Elena (Costume)
Elizabeth
Elkanen
Elkanen (Costume)
Elradir
Emilio
Esme
Evelyn
Faline
Fenrir
Ferant
Finley
Francine
Francine (Costume)
Frank
Frank (Costume)
Freya
Friar Tuck
Friar Tuck (Costume)
Frida
Frigg
Frosth
Frosty
Fura
Gadeirus
Gafar
Gaillard
Gan Ju
Gan Ju (Costume)
Garjammal
Garnet
Gato
Gefjon
Gill-Ra
Glenda
Gobbler
Gormek
Gormek (Costume)
Gramps
Gravemaker
Gravemaker (Costume)
Graymane
Graymane (Costume)
Grazul
Gregorion
Gretel
Grevle
Griffin
Grimble
Grimm
Grimm (Costume)
Guardian Bat
Guardian Chameleon
Guardian Falcon
Guardian Gazelle
Guardian Jackal
Guardian Kong
Guardian Owl
Guardian Panther
Guinevere
Gullinbursti
Gunnar
Gunnar (Costume)
Hanitra
Hannah
Hansel
Hawkmoon
Hawkmoon (Costume)
Heimdall
Hel
Helo
Hisan
Horghall
Horghall (Costume)
Hu Tao
Hu Tao (Costume)
Inari
Ingolf
Isarnia
Isarnia (Costume)
Isrod
Isshtak
Isshtak (Costume)
Jabbar
Jabberwock
Jack
Jack O'Hare
Jade
Jahangir
Jahangir (Costume)
Jarvur
Jean-Francois
Joon
Joon (Costume)
Jott
Justice
Justice (Costume)
Kadilen
Kadilen (Costume)
Kageburado
Kailani
Kailani (Costume)
Karil
Karil (Costume)
Karnov
Kashhrek
Kashhrek (Costume)
Kelile
Kelile (Costume)
Khagan
Khagan (Costume)
Khiona
Killhare
King Arthur
Kingston
Kiril
Kiril (Costume)
Kornel
Krampus
Krampus (Costume)
Kunchen
Kvasir
Lady Locke
Lady Loki
Lady of the Lake
Lady Woolerton
Leonidas
Leonidas (Costume)
Lepiota
Li Xiu
Li Xiu (Costume)
Lianna
Lianna (Costume)
Little John
Little John (Costume)
Lord Loki
Ludwig
Lughaidh
Mack
Maeve
Magni
Magni (Costume)
Malicna
Malosi
Marcel
Margaret
Marie-Therese
Marjana
Marjana (Costume)
Master Lepus
Melendor
Melendor (Costume)
Melia
Merlin
Mica
Miki
Milena
Mireweave
Misandra
Mist
Mitsuko
Mnesseus
Mok-Arr
Morel
Morgan Le Fay
Morris
Motega
Mother North
Mother North (Costume)
Mr. Pengi
Muggy
Musashi
Myztero
Nadezhda
Namahage
Nashgar
Nashgar (Costume)
Natalya
Neith
Noor
Nordi
Noril
Norns
Obakan
Obakan (Costume)
Oberon
Oberon (Costume)
Octros
Odin
Onatel
Onyx
Orla
Passepartout
Penolite
Perseus
Peters
Phileas Fogg
Pixie
Poppy
Poseidon
Prisca
Prisca (Costume)
Professor Lidenbrock
Proteus
Puss in Boots
Quartz
Queen of Hearts
Quenell
Quintus
Quintus (Costume)
Raffaele
Rana
Rana (Costume)
Ranvir
Ratatoskr
Red Hood
Renfeld
Renfeld (Costume)
Reuben
Rian
Richard
Richard (Costume)
Rigard
Rigard (Costume)
Roc
Rokkamush
Ruby
Rudolph
Rumpelstiltskin
Russell
Russula
Sabina
Sabina (Costume)
Salmon Loki
Sanngrior
Santa Claus
Santa Claus (Costume)
Saoirse
Sapphire
Sargasso
Sartana
Sartana (Costume)
Scarlett
Scarlett (Costume)
Senan
Sergei
Seshat
Seshat (Costume)
Shadereave
Shale
Shrubbear
Sif
Sir Lancelot
Sir Roostley
Skadi
Skittleskull
Skittleskull (Costume)
Skrekok
Snow White
Sonya
Sonya (Costume)
Squire Wabbit
Stonecleave
Sudri
Sumitomo
Sumle
Tarlak
Telluria
Tettukh
The Hatter
Theobald
Thor
Thorne
Thorne (Costume)
Thoth-Amun
Tiburtus
Tiburtus (Costume)
Toxicandra
Triton
Tyr
Tyrum
Tyrum (Costume)
Ulmer
Ulmer (Costume)
Uraeus
Ursena
Valen
Valen (Costume)
Valeria
Vanda
Vanda (Costume)
Vela
Victor
Victor (Costume)
Viscaro
Vivica
Vivica (Costume)
Vlad
Vodnik
Vollermork
Whacker
White Rabbit
Wilbur
Wolfgang
Wren
Wu Kong
Wu Kong (Costume)
Xnolphod
Yang Mai
Yunan
Yunan (Costume)
Zeline
Zenobia
Zila Lei
Zimkitha
Zircon
Zocc
Zulag
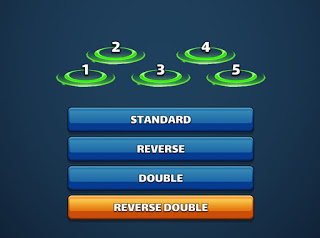
In the Reverse Double Formation, the front 3 defenders absorb all 7 of the attack columns. Position 3 gets damage from 3 attack columns. Positions 1 and 5 receive damage from 2 columns. The heroes on the back row can only be attacked by specials or when a hero on the front row is defeated.
Using The Reverse Double Formation on a defense team:
The double formation utilizes 3 tank positions. You want to use your 3 strongest heroes in the front row to protect your back row. Use a strong tank in Position 3. In positions 1 and 5, you can use tanks or strong flanks with fast mana that deal damage to all enemies. The enemy will have to decide which tank to attack or split the damage between all 3. This will keep your tanks alive longer and allow them to fire their specials more often.
You will want to use your wings, snipers, and heroes that need to be protected on the back row. Position 3 would be a great position for heroes whose special is applied to nearby allies.
Maximizing Position 3:
Consider using heroes that apply buffs or healing to
nearby allies in Position 3. In a standard formation, nearby allies means the heroes on the direct left or right. When placing this hero in position 3 in a Reverse Standard Formation, all heroes are considered
nearby allies . For example, when using Guinevere in position 3, ALL allies will regenerate HP and get +54% defense against Dark.
Things to consider when attacking the Reverse Double Formation:
In a Reverse Double Formation, Position 3 will generally be the strongest hero, especially if the enemy is using a defend 3 hero, since this special will now enhance all enemies. It is important to take out position 3 first. Taking out position 3 will also gives you access to the back row with tile attacks. Color stack your heroes against the enemy in position 3. This way you can quickly maximize attack damage from tiles. Also, consider attacking position 3 with heroes that attack the
target and nearby enemies . This will attack all enemies in this formation. For example, using Richard to attack the enemy in position 3 will deal major damage to position 3 and minor damage to the other 4 enemies. It will also give all enemies -34% attack.